Creating Named Credentials
You can manage SAP credentials in three ways:
- A single service account used by all Salesforce users
- Using each individual Salesforce user's SAP credentials for actions taken by them
- A blended approach using accounts for each user based on their profile
Service Account Named Credential
Summary
A service account named credential allows all users to authenticate to an external system using the same user ID and password.
It's usually acceptable to create a service account named credential for a testing / development environment.
Creating a Service Account Named Credential
Follow these steps to create a service account named credential:
- Use the Setup Quick Find box to search for "Named Credentials", then click the Named Credentials link.
- Click the arrow next to New and then click the New Legacy button.
Fill in the New Named Credential Form
- Enter the appropriate values in the Label, Name, and URL fields.
- Select the appropriate certificate (not pictured below).
- Choose Named Principal for the Identity Type.
- Choose Password Authentication for the Authentication Protocol.
- Enter the Username and Password to use for this named credential.
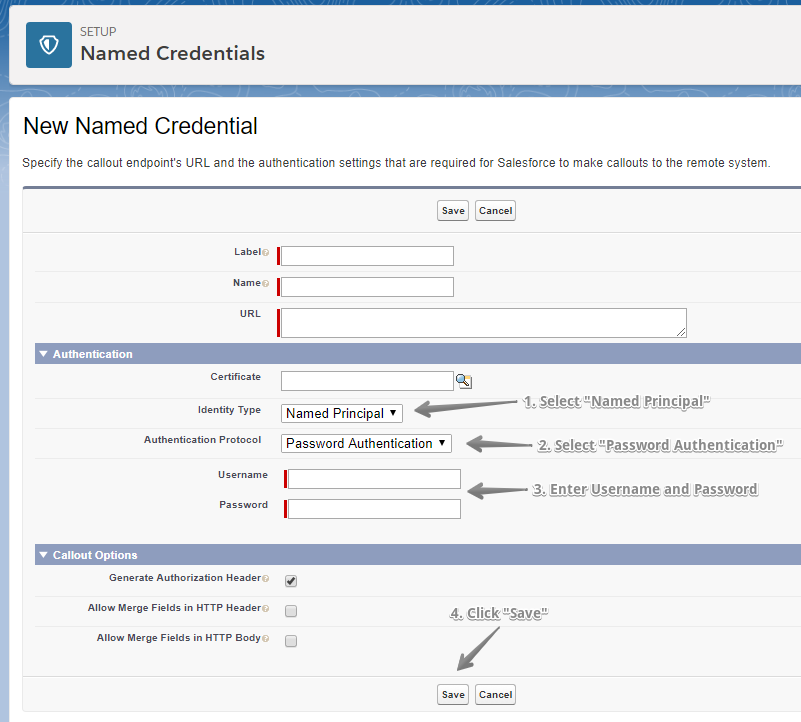
- Click Save to create the new named credential.
Per-User Named Credential
Summary
A per-user named credential requires each user to authenticate to the external system using their own unique username and password.
You should always use per-user named credentials in production environments to ensure data security.
SAP authorizations and restrictions are respected when interacting with the SAP system. Therefore, best practice is to have each user authenticate with their SAP credentials.
Configuring Per-User Named Credential
The following steps must be taken by a System Administrator before authentication settings can be set:
- Set up the named credential to use Identity Type "Per-User"
- Grant access to manage named credentials via permission sets or profiles.
User authentication settings can be managed by a system administrator or by each user.
- How to configure Per-User Authentication as a system administrator
- How to configure Per-User Authentication as a user
Creating a New Per-User Named Credential
-
Type "Named Credentials" in the Setup Quick Find box, then click the Named Credentials link.
-
Click the arrow next to New and then click the New Legacy button.
-
Enter the appropriate values for your environment.
a. Select the appropriate certificate.
b. Select Per User for the Identity Type.
c. Select Password Authentication for the Authentication Protocol. The Username and Password fields aren't used here since the users will add the SAP credentials under their profile settings.
d. Enter a placeholder (example: NOT-USED) as the Username and Password. Set the SAP credentials for per user authentications under Users - Configuring Per-User Authentication or Administrators - Configuring Per-User Authentication.
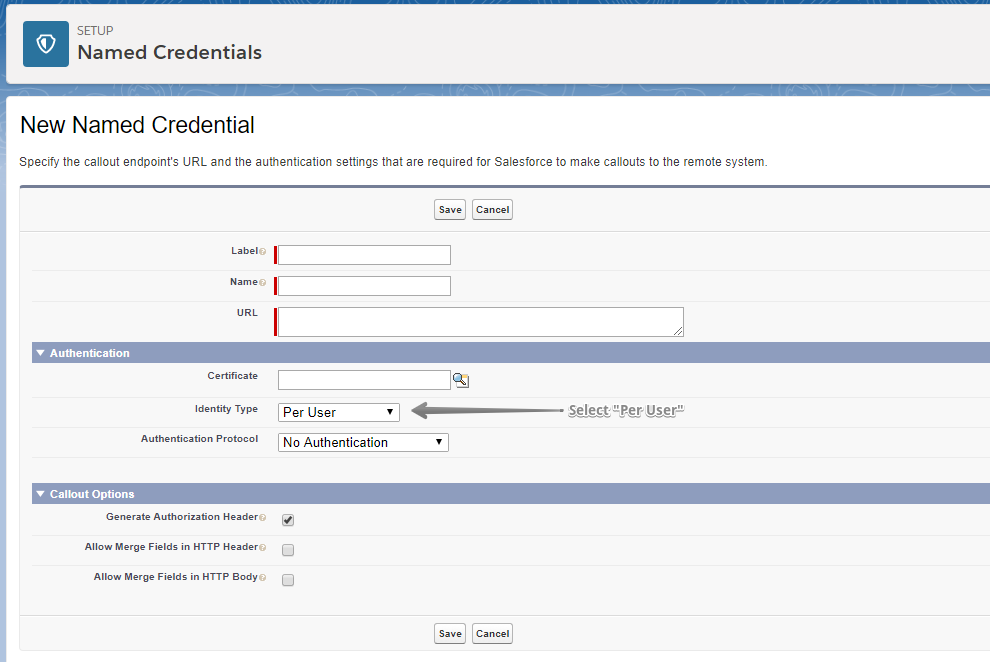
- Click Save to create the new credential.
Granting Access to Manage Named Credentials
Use Permission Set and Profiles to grant access to a user to manage named credentials.
Granting Access in Permission Sets
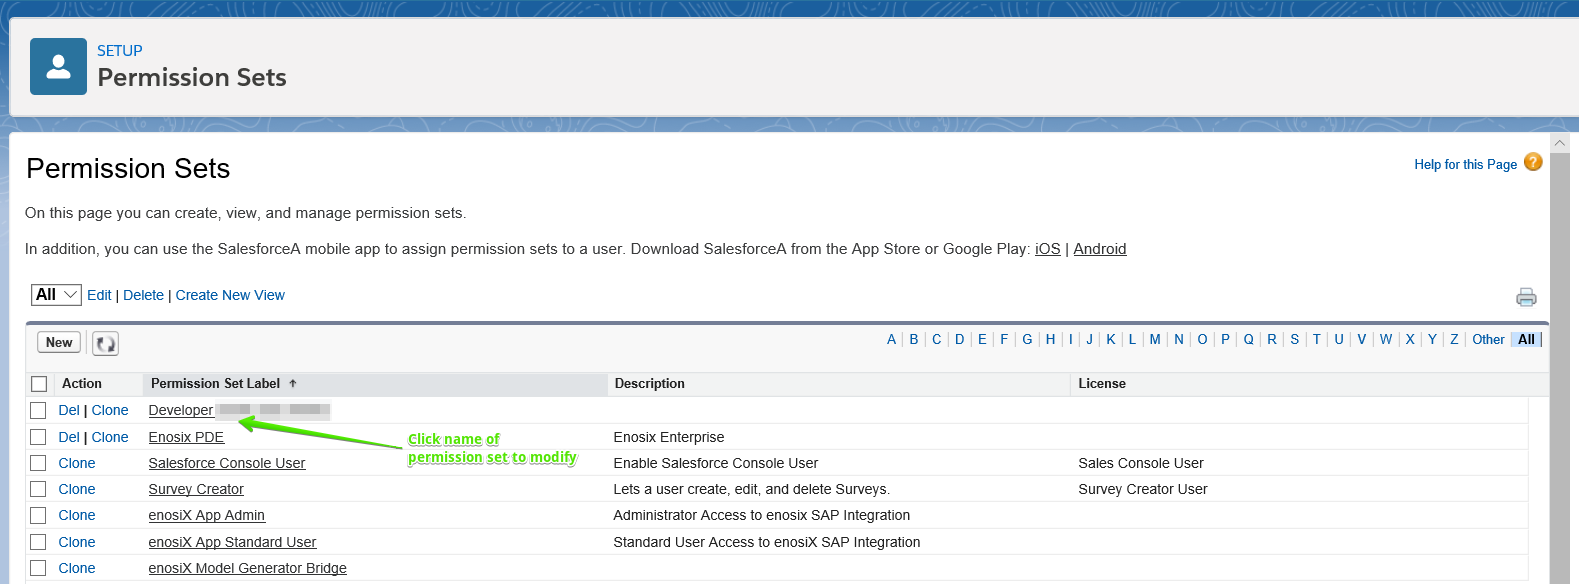
- Type "Permission Sets" in the Setup Quick Find box, then click the Permission Sets link.
- Click the name of the permission set you want to modify**.**
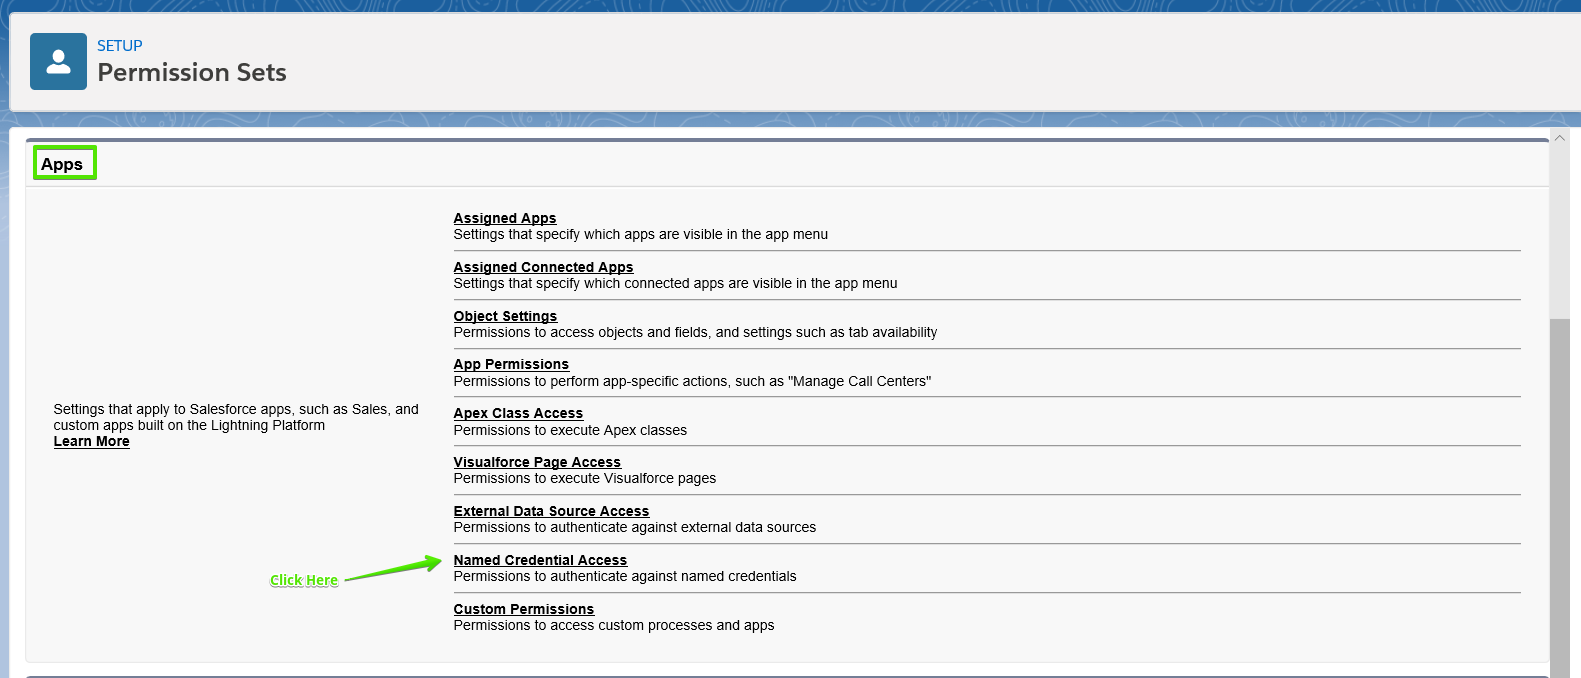
- Scroll to the Apps Section.
- Click Named Credential Access.
- Click Edit.
- Add the named credentials that you want to enable.
- Click Save.
Granting Access in Profiles
- Type "Profiles" in the Setup Quick Find box, then click the Profiles link**.**
- Click the name of the profile that you want to modify.
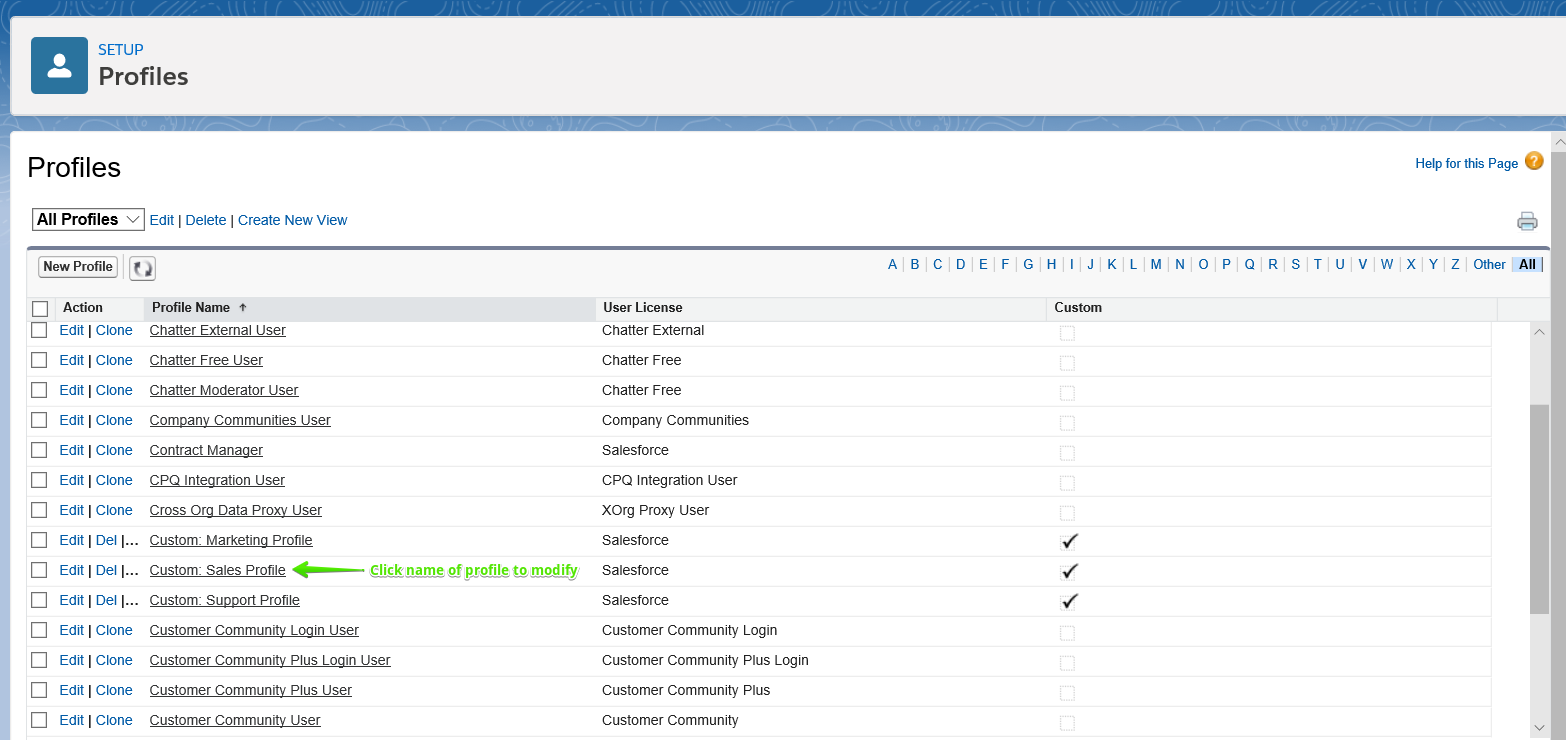
- Click Enabled Named Credential Access.
In the original user interface you would click Edit in the Enabled Named Credential Access section.
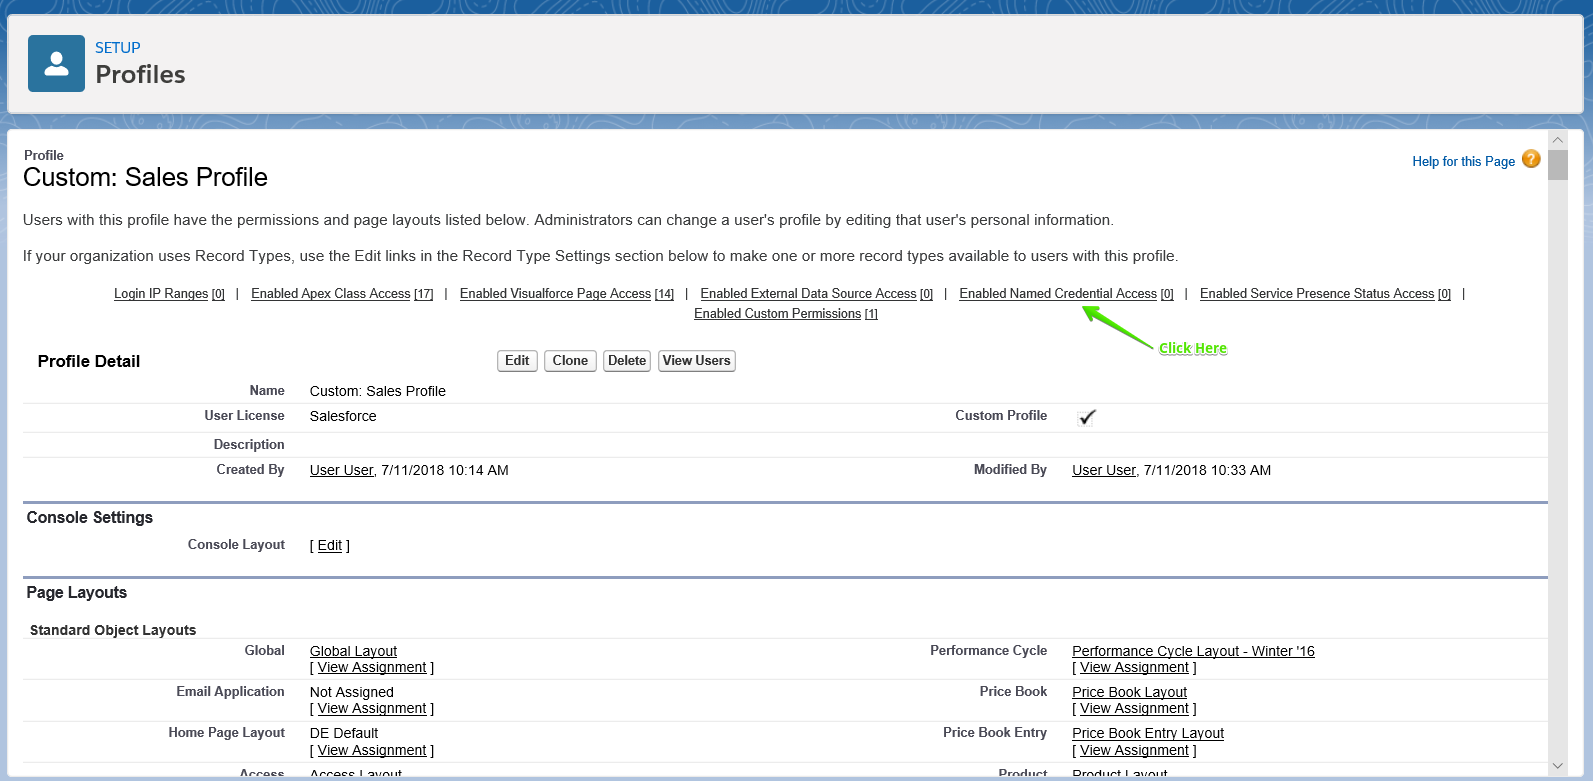
- Add the named credentials that you want to enable.
- Click Save.
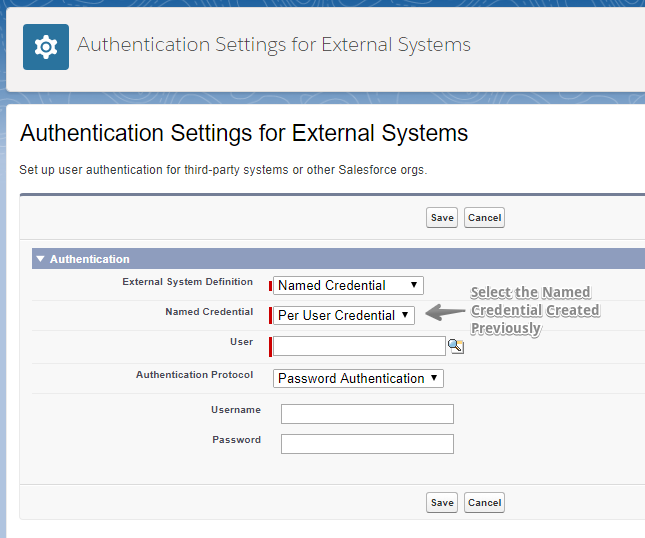
Administrators - Configuring Per-User Authentication
If you're using a Named Principal for SAP connectivity, the following steps do not apply.
- Type "Users" in the Setup Quick Find box, then click the Users link**.**
- Select the user you wish to configure access for.
- Click Authentication Settings for External Systems (as shown in the screenshot below).
- Click the New button in the panel that appears.

- Select the default Named Credential enosix_SAP or the one configured for the user/role.
- Enter the SAP credentials in the Username and Password fields.
- Select the user.
- Click Save.
Users - Configuring Per-User Authentication
- Click your profile picture in the top-right corner of the screen.
- Click Settings.

- Under My Personal Information, select Authentication Settings for External Systems.
- Click New (to create a new authentication) OR Edit (to update an existing authentication).
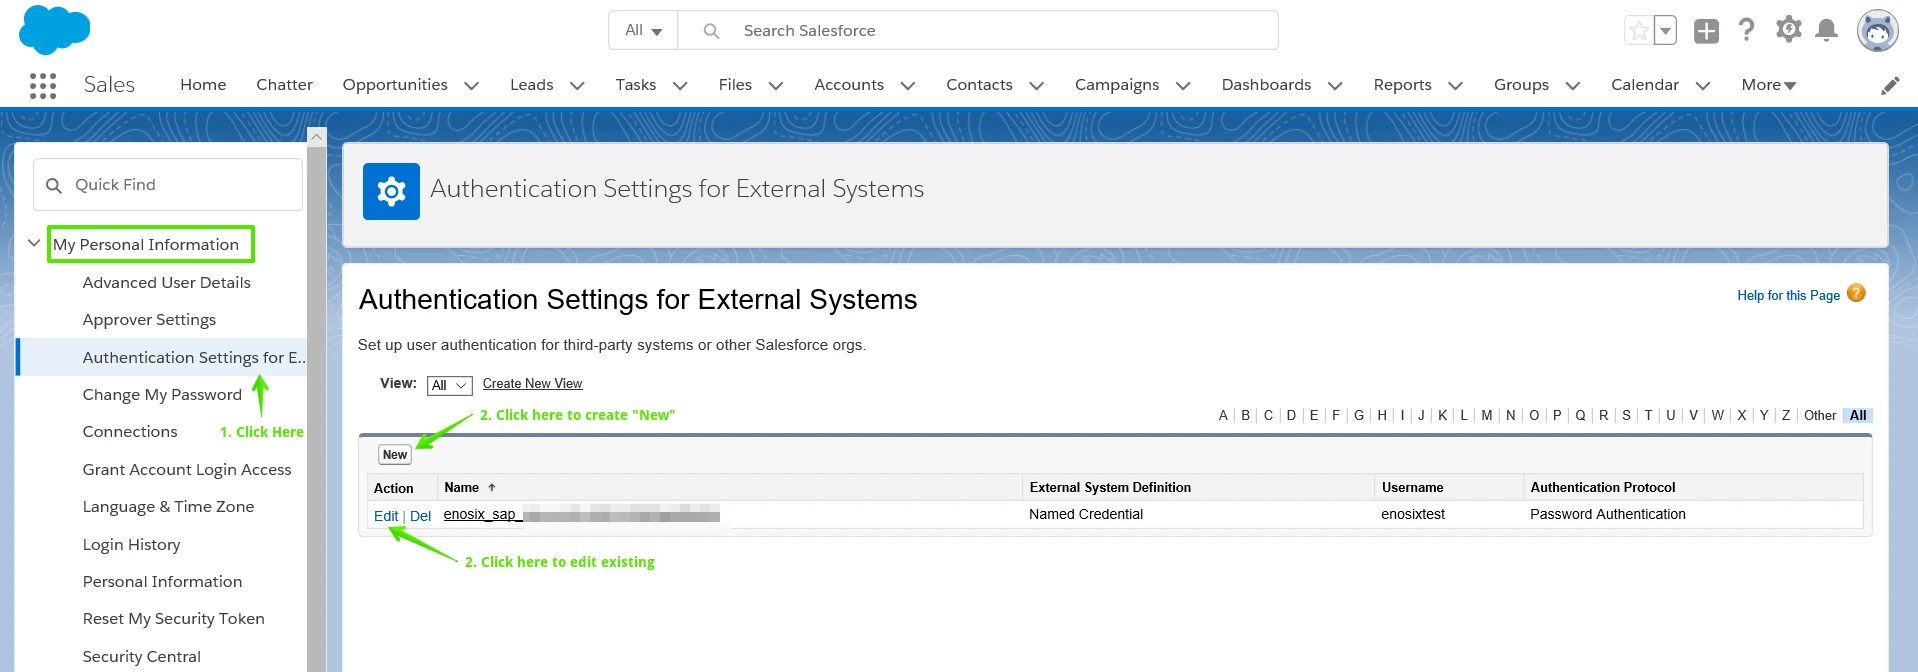
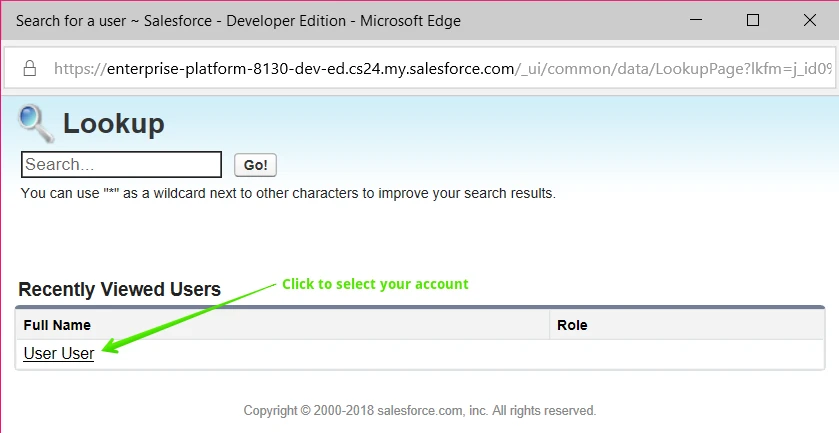
- Click the magnifying glass icon to search for your name with User Lookup.

- Select your account.
- Enter your SAP credentials in the Username and Password fields.
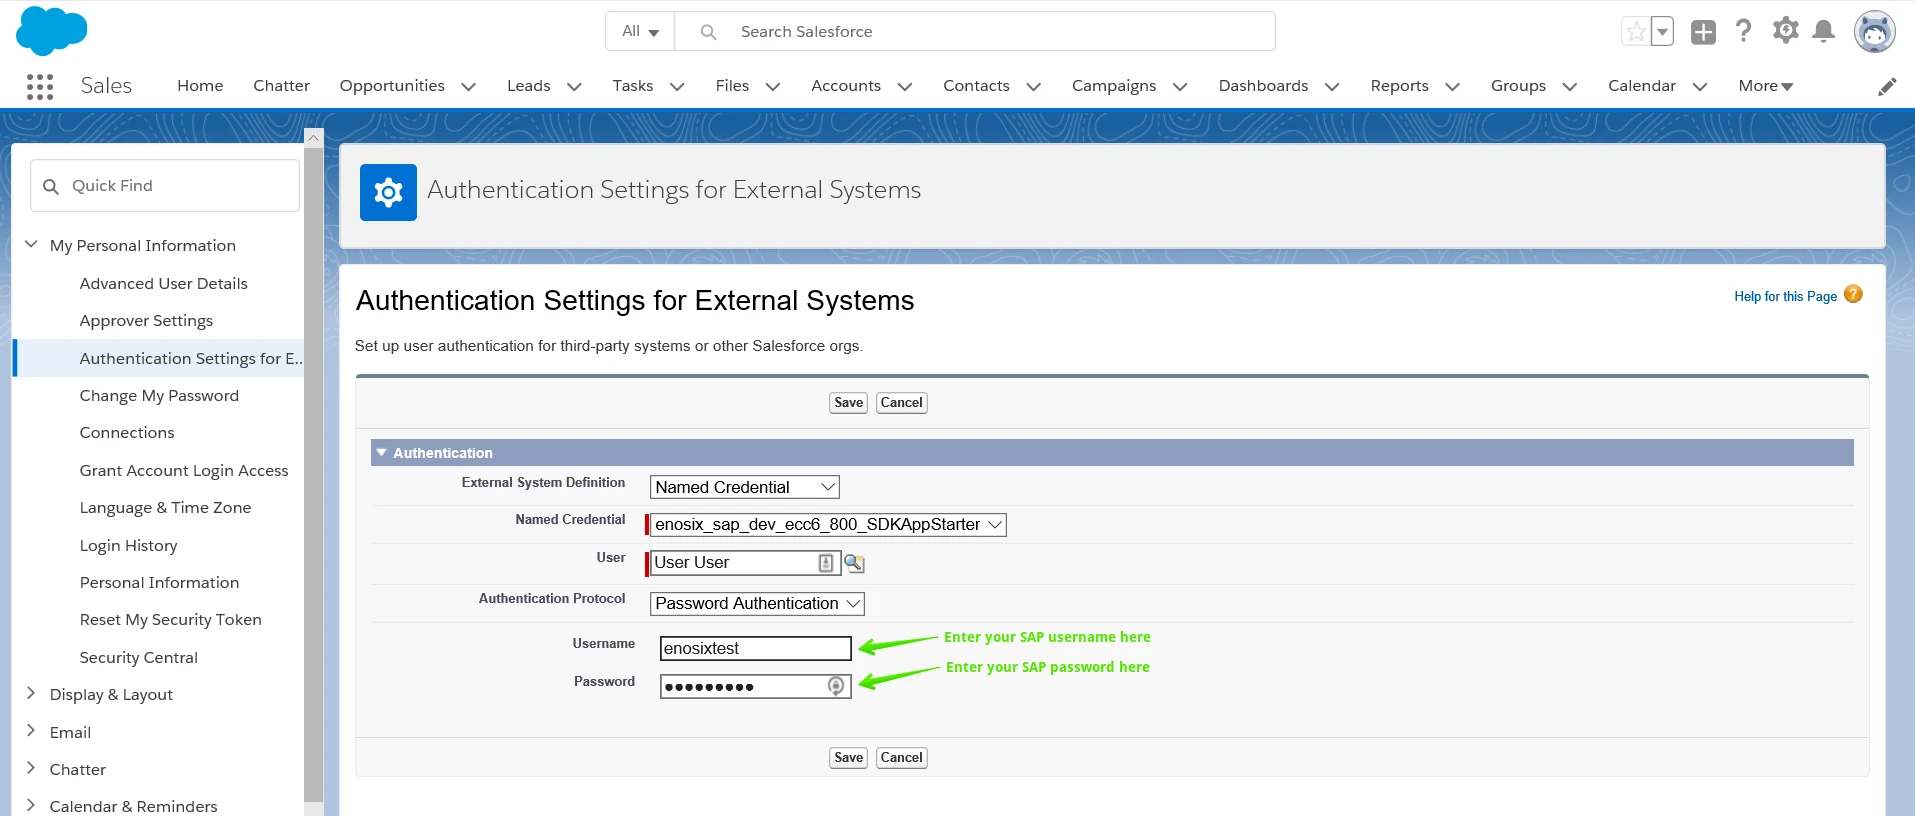
- Click Save.
- Type "Custom Settings" in the Setup Quick Find box, then click the Custom Settings link**.**
- Click the Manage link next to enosiX Framework.
- To create a profile-based authentication record, click New.
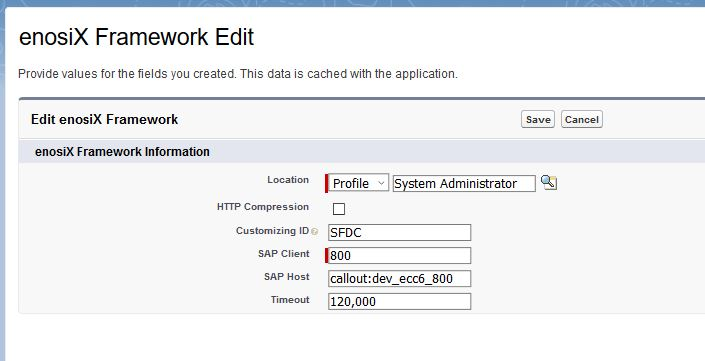
- Under Location, select the profile you want to configure to use a service account named credential.
- Under SAP Client, enter the SAP Client the credentials to use to connect to SAP.
- Under SAP Host, enter "callout:" followed by the service account named credentials name (see the example below).
- Save the configured record for the Profile Based Authentication.
- Login with the username that's assigned to the configured profile.
- Open the App Launcher - enosiX Framework - Connection Test.
- Under Settings Level, you'll see Profile: Your configured Profile.
- Perform a Test Connection to confirm that the configuration works properly.
-e8e2500c096fe0722ecb38df7214489a.png)
Profile-Based Authentication
Summary
Use profile-based authentication when you need multiple users to connect to an external system using the same SAP user ID and password assigned to one named credential.
You can use Per User Named Credentials and Profile-Based Authentication at the same time. Just set the Per User Named Credential as the default under App Launcher - enosix Framework - Connection Settings - Host.
The Salesforce Users that are assigned to the Per User Named Credential will enter their own SAP credentials. The Salesforce Users assigned to a Profile that has Profile-Based Authentication configured will use the Named Credential record that's configured under SAP Host.
Configuring Profile-Based Authentication
Follow these steps to configure Profile-Based Authentication:
- Use the Setup Quick Find box to search for "Custom Settings", then click the Custom Settings link.
- Click the Manage link next to enosiX Framework.
- To create a profile-based authentication record, click New.
- Under Location, select the profile you want to configure to use a service account named credential.
- Under SAP Client, enter the SAP Client the credentials to use to connect to SAP.
- Under SAP Host, enter "callout:" followed by the service account named credentials name (see the example below).
- Save the configured record for the Profile Based Authentication.
- Login with the username that's assigned to the configured profile.
- Open the App Launcher - enosiX Framework - Connection Test.
- Under Settings Level, you'll see Profile: Your configured Profile.
- Perform a Test Connection to confirm that the configuration works properly.
Troubleshooting
- Named Credentials are case-sensitive – Check to see whether you've provided the correct URL in your named credential and that you've used the proper case for both the username and the password.
- Have your SAP administrator confirm that the username and password are correct and activated for the specific instance you're logging in to.
- Have your SAP administrator ensure that the login account is not locked out due to too many attempts to log in.